Powered By Blogger

Wednesday, October 27, 2010

Pumpkin Bake-Off Entry: Pumpkin Whoopie Pies!

I entered these for a pumpkin bake-off and placed as 1st runner up! Not the winner but 1st place is good enough for me, plus I got a nice bottle of Torrontes as my prize.

These whoopie pies are cute and little, resembling french Macarons but tasting nothing like them. It's basically two moist pumpkin cakes, sandwiching a tart and sweet cream cheese frosting.

The recipe is from Baked Bakery, as posted on Marthastewart.com.

Here's the recipe: Pumpkin Whoopie Pies with Cream -Cheese Filling.

Tuesday, October 12, 2010

Two of my favorite things: SPAM, and EGGS

Spam, and over-easy eggs. These are at the top of my list of favorite things to eat. I love the saltiness and the concentrated meatiness of Spam. It makes almost any dish more flavorful. Same with over-easy eggs - it completes any simple dish. I put it on top of a bowl of rice with sesame oil and soy sauce, and I've got a meal. I also slap it on toasted, buttery bread with salt, pepper and dash of Sriracha. Tastes great as a pizza topping, and also with ramen noodles. And of course, on top of Kimchi Fried Rice.

Kimchi Fried Rice is a popular Korean comfort dish. It mainly consists of some meat, rice (short-grain), Kimchi, and egg. For the meat some people use pork loin, many use spam, and I've even seen a recipe with bacon. My favorite way to make it is with Spam, it gives intense flavor to the fried rice.

The egg on top is a classic Korean addition. I can't wait to pierce the yellow egg yolk and watch as it runs all over the salty spam bits, kimchi, and rice. Green onions lend balance to this hearty dish.


Ingredients:
Oil (canola, vegetable, or light olive oil)
3 cups of pre-made short-grain rice (best if day old and left out at room temp)
1 cup kimchi, chopped, with a few tablespoons juice from the jar
1/2 can of spam, diced
½ onion, diced
3 cloves of garlic, minced
1 tbsp soy sauce
1 tbsp sesame oil
1 green onion, chopped
1 egg per serving
Salt to taste

Instructions:
1. Heat up 1 tbsp oil in a large frying pan.

2. Cook the onion and garlic for 1 minute over medium heat, just until the onions start getting tender.

3. Add the Spam to the pan. Cook for about 4 minutes on medium heat, or until the Spam gets slightly browned.

4. Put in the cooked rice and mix well. Add 1 tbsp of soy sauce and 1 tbsp of sesame oil.

5. Make a well in the center of the pan and add the kimchi to it, let it cook for 1 minute. Then combine it with the other ingredients in the pan (onion, garlic, rice, spam), mixing well.


6. Cook for about 5 minutes so the rice fully absorbs the flavors and dries out. Mix every few minutes, and add in salt to taste.

7. Fry the egg in a separate pan with plenty of oil (about 1 tbsp or more if needed). To make a good over-easy egg: Heat the oil well over medium-high heat, add the egg and let alone for a minute. After the edges begin to set, take a heat proof spoon and repeatedly scoop the hot oil over the top of the egg - this cooks the top of the egg but not so much that the egg yolk gets cooked. The egg is ready when the whites on top look cooked (not jiggly, not translucent).

8. Plate the finished fried rice and lay the fried egg on top of each serving.

9. Finish with some fresh scallion garnish.


Tuesday, October 5, 2010

Salted Caramel Ice Cream!!


My favorite place for ice cream in S.F. is Bi-Rite Creamery in the Mission Dolores area. Their Salted Caramel Ice Cream has the perfect balance of sweet and salty. The texture is creamy and incredibly dense, just the way I like it.

I wanted to see if I could make a salted caramel ice cream that would come close to Bi-Rite's.
I found a Salted Butter Caramel Ice Cream recipe on famed food blogger and cookbook author David Lebovitz's blog, David Lebovitz.com. Lebovitz's recipe adds a twist with crushed salted caramel candy swirled in at the very end of the ice cream-making process.  
I tried the recipe and it very close to Bi-Rite's Salted Caramel Ice Cream.  It turned out rich, creamy, dense, and with a very similar balance of buttery, sweet caramel and salt. It is definitely an ice cream recipe worth trying out, especially if you don't live in S.F. near Bi-Rite Creamery or you just want a big bucket ready for your indulging in the freezer.


For the salted caramel candy mix in:
½ cup granulated sugar
¾ teaspoon sea salt

For the ice cream custard/base:
2 cups whole milk, divided
1½ cups granulated sugar
4 tablespoons salted butter
½ teaspoon sea salt
1 cups heavy cream
5 large egg yolks
¾ teaspoon vanilla extract

Other Important Materials:
Ice Cream Maker (recommend Cusinart ICE-30BC)
Baking sheet, and oil or sheet to line
Ice (for ice bath)


MAKING THE SALTED CARAMEL PIECES:
1. Spread ½ cup of the sugar in an even layer in a medium-sized, heavy duty saucepan. Line a baking sheet with parchment paper, foil, or spray it lightly with unflavored baking spray (like Pam).


2. Heat the sugar over medium heat until the edges begin to become translucent and begin to dissolve. Use a heatproof utensil to gently stir the liquefied sugar from the bottom and edges towards the center, stirring, until all the sugar is dissolved. Melt as many leftover lumps of sugar as possible, but it's fine if there are a few left.

3. Continue to cook stirring infrequently until the caramel starts smoking and begins to smell like it is just about to burn, it will only take a minute or two to get here. Quickly sprinkle in the ¾ teaspoon salt and then immediately pour the HOT caramel (be careful!) onto the lined baking pan and tilt the pan in circles to make the caramel spread very thin. It will begin hardening immediately so move quickly. The thinner the better.
4. Let the caramel cool until completely hardened, then crush into fine confetti-sized pieces in a ziplock bag with a rolling pin, or with a mortar and pestle if you have one.

If you don't crush them fine enough you will end up with a bunch of crunchy hard pieces of caramel in your ice cream. If you crush them fine the caramel pieces will actually dissolve and result in nice swirls of caramel, with few crunchy pieces that never dissolve here and there.


MAKING THE ICE CREAM BASE:
1. Start by making an ice bath:   fill a large bowl about a third full with ice cubes and add a cup or so of water so they’re floating. Nestle a smaller metal bowl (at least 2 quarts) over the ice, and pour 1 cup of the milk into the inner bowl, and rest a mesh strainer on top of it.

2. Spread 1½ cups sugar in a medium sized saucepan in an even layer. Cook over moderate heat, until caramelized, using the same method described in Step 2 above.

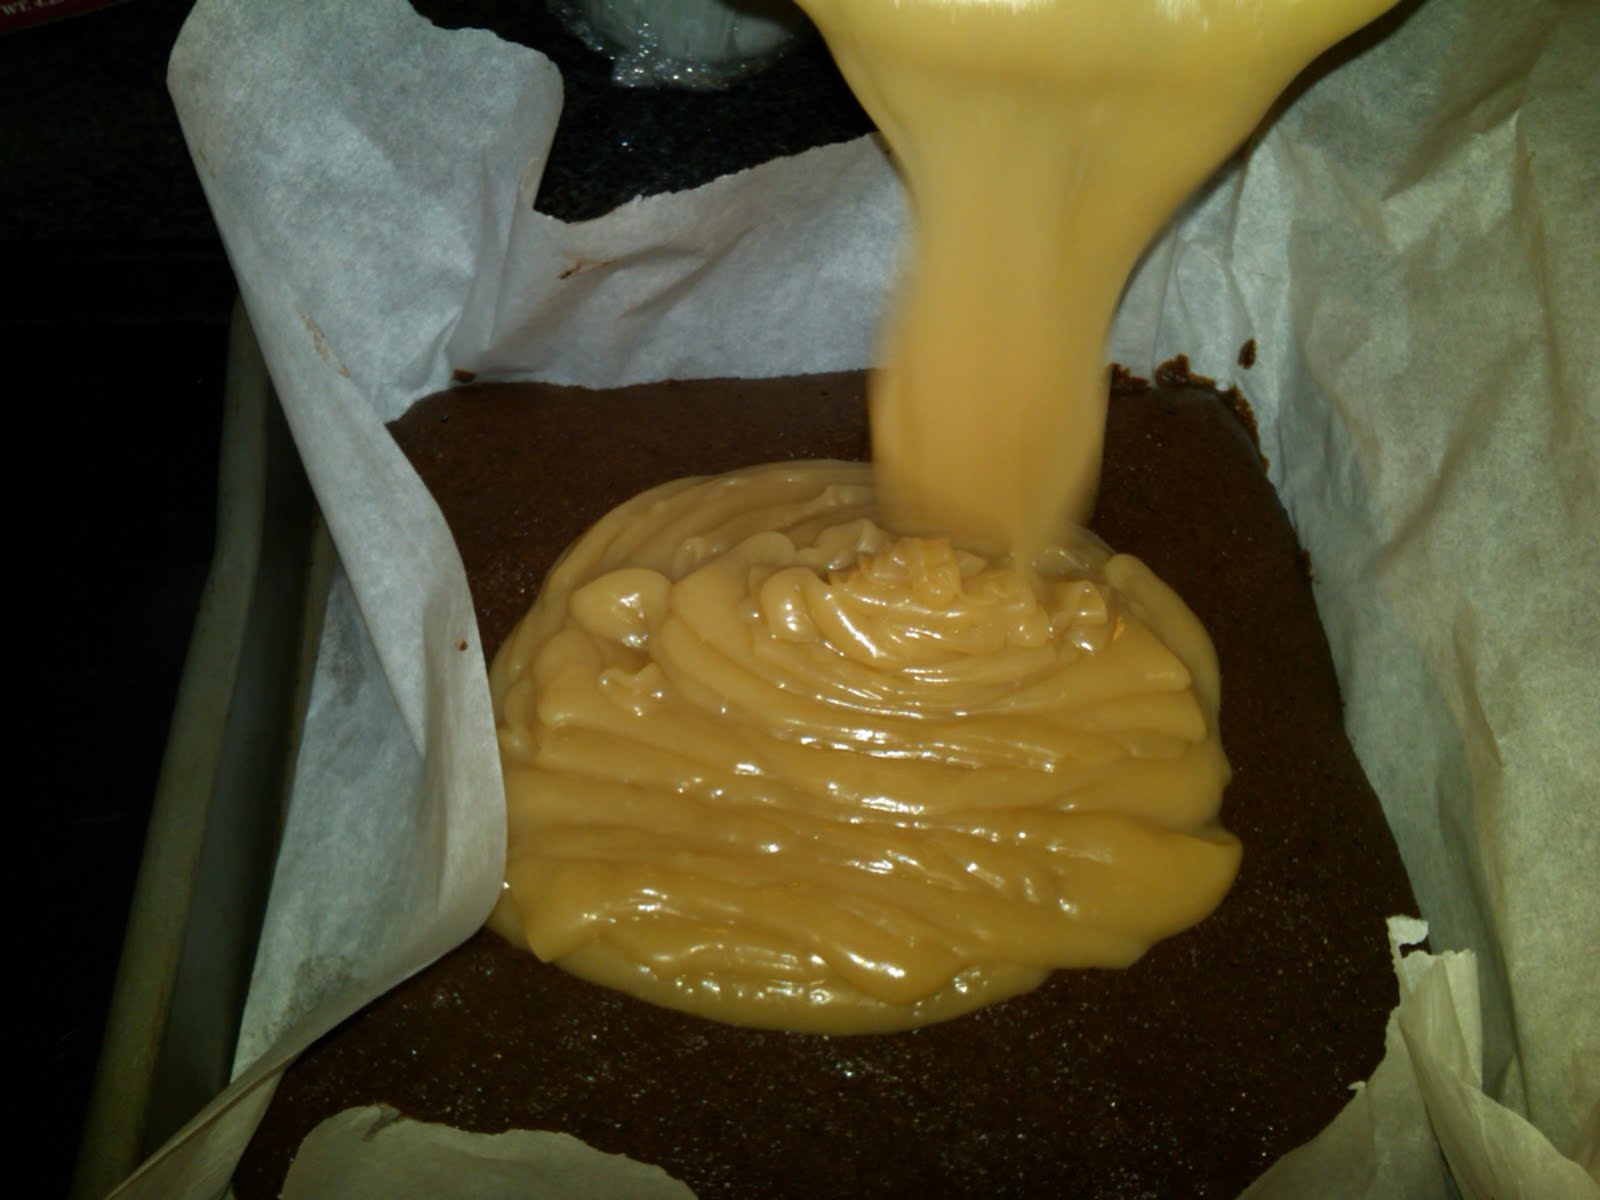
3. Once the sugar is caramelized remove the pan from heat and add the 4 tablespoons butter and 1/2 teaspoon salt. Stir until dissolved. Then slowly whisk in the 1 cup heavy cream. This will cause the caramel to seize up and harden but it will melt again when you return it to the heat.


4. Return the pan to the heat and stir until all the caramel is dissolved. Stir in 1 cup of milk.


5. Whisk together the 5 egg yolks in a small bowl. Gradually pour some of the warm caramel mixture over the yolks, stirring constantly, slowly bringing the temperature of the eggs up. (If you add too much caramel too quickly, you will end up with scrambled eggs, so take your time). Scrape the warmed yolks back into the saucepan and cook the custard over medium-low heat using a heatproof utensil, stirring constantly and scraping the bottom, until the mixture thickens.You will know it's ready when it is thick enough that you when you run dip your spoon and then your finger through it the line holds.

6. Pour the custard through the strainer into the bowl of milk set over the ice bath, add the vanilla, then stir frequently until the mixture is cooled down, about 20 mins. Then cover and refrigerate the custard for at least a couple of hours, until it is completely chilled.


7. Turn on your ice cream maker and pour the chilled custard in. Follow the instructions for your particular machine (my Cuisinart requires 20-25 minutes of churning).
Once your ice cream is finished churning, stir in the crushed caramel pieces, pour into a container, and chill in the freezer until firm.


Tuesday, July 27, 2010

Brownie Week Recipe #3: PEANUT BUTTER SWIRL BROWNIES


Nobody can resist the classic combination of peanut butter and chocolate. Nothing fancy about it, this is a fairly basic brownie that anyone would love and it's easy to make. 

Substitutions:
If you don't have all the ingredients you can always substitute, carefully. For example, I didn't have unsweetened chocolate and since this recipe calls for 3 ounces unsweetened chocolate I just substituted 3 ounces semisweet chocolate, and then reduced the sugar by a bit later in the recipe. I also didn't have the instant coffee granules suggested in the recipe, but instead I used instant espresso powder, it turned out just fine. Also, feel free to add more peanut butter if you are a huge peanut butter lover.

This recipe is by the Barefoot Contessa but I halved it since the recipe was huge. I didn't make any other adaptations to it because it's already perfect. 

Ingredients 
  • 8 ounces (2 sticks) unsalted butter 
  • 8 ounces plus 6 ounces semisweet chocolate chips, divided 
  • 3 ounces unsweetened chocolate 
  • 3 extra-large eggs 
  • 1 tablespoons instant coffee granules (or instant espresso powder
  • 1 tablespoons pure vanilla extract 
  • 1 1/8 cups sugar 
  • 1/2  plus 1/8 cup all-purpose flour, divided 
  • 1/2 tablespoon baking powder
  • 1/2 teaspoon kosher salt 
  • 1/2 cup smooth peanut butter 

    Directions

    Preheat the oven to 350 degrees F. Butter and flour a 9 x 13 in pan. Or line it with parchment paper for easy removal.

    Melt together the butter, 8 ounces of chocolate chips (save the rest for later) and the unsweetened chocolate in a medium bowl over simmering water. Allow to cool slightly. In a large bowl, stir (do not beat) together the eggs, coffee granules, vanilla, and sugar. Stir the warm chocolate mixture into the egg mixture and allow to cool to room temperature.
    In a medium bowl, sift together 1/2 cup of flour, the baking powder, and salt. Add to the cooled chocolate mixture. Toss the remaining 6 ounces of chocolate chips in a medium bowl with 1/8 cup of flour, then add them to the chocolate batter. Pour into the prepared sheet pan. 

    Spoon the peanut butter over the top of the chocolate mixture and using a knife, swirl it through the chocolate mixture (You may first warm the peanut butter in the microwave for 20 seconds to make it easier to spread).

    Bake for 20 minutes, then rap the baking sheet against the oven shelf to force the air to escape from between the pan and the brownie dough. Bake for about 10 to 15 minutes more or until a toothpick comes out clean. Do not overbake! Allow to cool thoroughly, refrigerate, and cut into large squares.

    Thursday, July 22, 2010

    Brownie Week Recipe #2: SALTED CARAMEL BROWNIES


    This is an ooey gooey, super rich and chocolatey, fudgy brownie. The soft salty caramel is the perfect balance to the sweet chocolate.

    I adapted the recipe from one I found online - I put in a little more chocolate and added the espresso powder. The small amount of espresso powder doesn't make the brownie taste like coffee, it just makes the chocolate flavor more intense (I learned this tip from Ina Garten/Barefoot Contessa). 

    Not the simplest recipe to make because you have to also make a salted caramel filling which can be a little tricky if you don't watch the caramel carefully. Just read the directions very carefully before beginning and don't walk away from the pot of sugar and corn syrup, and it will turn out great! Make extra and save it in the refrigerator or freezer to drizzle on top of chocolate cake or ice cream.

    Salted Caramel:

    • 1/2 cup heavy cream
    • 1 teaspoon sea salt
    • 1 cup sugar
    • 2 tablespoons light corn syrup
    • 1 teaspoon Vanilla
    • 1/4 cup sour cream

    1. In a small saucepan, combine the cream and the salt.  Simmer over very low heat until the salt is dissolved. set aside.

    2. In a medium saucepan combine the sugar and corn syrup carefully. Cook over high heat until it is a medium goldish brown – about 6-7 minutes. 

    Don't overcook the caramel - it should appear light golden brown when you take it off because it will continue to cook in that pot even after you remove it from the burner. Remove from heat and let cool 1 minute.

    3. Then add  the cream mixture and the vanilla to the sugar mixture. Don't worry it is supposed to bubble up and sizzle a bit. Whisk in the sour cream.  Let the caramel cool to room temperature and set aside. Before using caramel strain out any big lumps.

    Brownies:

    • 6 ounces unsweetened chocolate, roughly chopped
    • 1/2 cup unsalted butter
    • 1 tablespoon espresso powder
    • 1 1/2 cups sugar
    • 3 eggs
    • 2 teaspoons vanilla
    • 1 1/4 cups all purpose flour
    • pinch salt
    • 1/4 cup Chocolate Syrup
    • half of the caramel recipe

    1. Preheat oven to 325F. 


    2. Melt chocolate and butter in small saucepan over low heat until smooth. Remove from heat and stir in espresso powder. Allow to cool for 5 minutes.

    3. In a bowl, whisk together sugar, eggs, and vanilla, and mix until well combined. Don't whisk in a lot of air -   we are not trying to make a fluffy brownie.

    4. Add flour, salt, chocolate syrup and chocolate mixture and blend well.

    5.
    Pour half of the brownie batter into a greased 8×8 pan and bake for 18 minutes.


    6. Carefully remove the hot pan from the oven and pour in the caramel.


    7. Then on top of the caramel, add the rest of the brownie batter. Smooth the top and return to oven and bake for another 18-22 minutes.


    Don't overbake, even if it appears a little jiggly it is fine, it will firm up after cooling completely. Also, this is a very fudgy, moist brownie recipe so it should not be completely firm when you take it out of the oven. Let cool completely before cutting.


    They will be sticky, rich, and delicious!


    If you like a less rich recipe try - Dark Chocolate Espresso Brownies- equally yummy but more cake-like, less gooey, and more bittersweet - perfect for coffee-lovers and those who don't like too sweet brownies.

    Monday, July 19, 2010

    Brownie Week Recipe #1: DARK CHOCOLATE ESPRESSO BROWNIES

    Intense flavors of dark chocolate and espresso wrapped into a rich, semi-sweet, cake-like brownie. Perfect for the coffee lover ~ I wrapped up a batch of these in a clear goodie bag and a pretty pink bow for my mom's birthday. They are surprisingly simple to make.

    I made this recipe after trying several different recipes and finding that many were too sweet for a dark chocolate lover. I toned down the sugar content, used a more bitter dark chocolate and upped the espresso amount in the recipe. I hope you enjoy it, bon appetit!

    Ingredients:

    • 6 ounces dark chocolate, roughly chopped*
    • 1 1/2 sticks (6 ounces) unsalted butter
    • 2 tablespoons unsweetened cocoa powder 
    • 2 tablespoons espresso powder**
    • 2 eggs
    • 1 cup sugar
    • 2 teaspoons pure vanilla extract
    • 1 cup all-purpose flour
    • 1/4 teaspoon salt 
    *For the dark chocolate I used Trader Joe's dark chocolate bar (brown wrapping, comes in packs of 3 bars).
    **For the espresso powder I use Medaglia D'Oro Instant Espresso Powder

    Directions:

    1. Preheat the oven to 350°. Lightly butter a 9-inch square baking pan. (Optional: for easiest removal also line the baking pan with parchment paper leaving the paper hanging over the edges of the pan so you can easily lift out the brownies after baking). Melt the chocolate and butter in a heatproof bowl set over a saucepan with 1 inch of simmering water. Remove from the heat, stir in the cocoa powder and espresso powder and let cool.
    2.  Whisk or sift the flour and the salt together in a medium bowl and set aside.
    3. In a large bowl, beat the eggs at medium speed for 1 minute. Add the sugar and beat until the mixture is pale yellow, about 2 minutes. Fold in the melted chocolate and vanilla. Add the flour-salt mixture, folding just until combined. Spread the batter evenly in the prepared pan.
    4. Bake the brownies for about 40-45 minutes, or until a toothpick inserted in the center comes out clean. Let cool completely before cutting into squares.